기획팀 요구사항 : Console에서 FCM를 보낸후 사용자가 클릭하면 원하는 페이지로 가도록 만들어주세요.
나 : 음 일단 해볼게요. 근데 client 단에서 하는 방법은 있는데요. 콘솔은 아직 못찾았어요.
기획팀 : 그래도 콘솔이 좋겠어요. ㅅㄱ요
저런 느낌의 대화가 진행되고 다시 찾아봤습니다. 다양한 페이지를 찾아봤는데 FireBase의 console 로 보내는 FCM의 경우 클릭 이벤트를 구현하는 페이지는 찾기 어려웠습니다.
많은 경우가 메시지 안에
click_action : .MyActivity
를 넣고나서 intent filter로 넘겨버리는 방법을 사용하고 있습니다.
하지만 저는 콘솔에서 해야함으로 일단 콘솔을 봤습니다.


콘솔을 보니 알림부분은 notification 부분에 뜨는 듯하고 아래를 보니 추가옵션이 있습니다. 그 중에 맞춤데이터로 뭔가가 가능하겠더군요.
그래서 목표를 저기 5번 추가 옵션(선택사항)의 맞춤데이터(custom data)로 원하는 데이터를 보내고 그걸 토대로 원하는 액티비티를 띄워주기로 하고 데이터를 찍어보기로 했습니다.
이제 여기서부터는 안드로이드상에서 구현했던 부분입니다.
<build.gradle>
  // Add the SDK for Firebase Cloud Messaging
    implementation 'com.google.firebase:firebase-messaging:20.2.0'
<manifests>
    <application
        <activity android:name=".MainActivity">
            <intent-filter>
                <action android:name="android.intent.action.MAIN" />

                <category android:name="android.intent.category.LAUNCHER" />
            </intent-filter>
        </activity>
        <activity android:name=".firebase.authentication.FirebaseUIActivity" />

        <service
            android:name=".firebase.service.MyFirebaseMessagingService">
            <intent-filter>
                <action android:name="com.google.firebase.MESSAGING_EVENT"/>
            </intent-filter>
        </service>
여기 service 안에 구현해줍시다.

<MyFirebaseMessagingService.class>
package com.example.room_exam.firebase.service;

import android.util.Log;

import com.google.firebase.messaging.FirebaseMessagingService;
import com.google.firebase.messaging.RemoteMessage;

public class MyFirebaseMessagingService extends FirebaseMessagingService {
    private final static String TAG = "FCM_MESSAGE";

    @Override
    public void onMessageReceived(RemoteMessage remoteMessage) {
        super.onMessageReceived(remoteMessage);
        Log.d(TAG, "Notification Body: " );
        if (remoteMessage.getNotification() != null) {
            String title = remoteMessage.getNotification().getTitle();
            String body = remoteMessage.getNotification().getBody();
            String clickAction = remoteMessage.getNotification().getClickAction();
            String form = remoteMessage.getFrom();
            String custom = remoteMessage.getData().get("custom");
            Log.d(TAG, "Notification Title: " + title);
            Log.d(TAG, "Notification Body: " + body);
            Log.d(TAG, "Notification clickation: " + clickAction);
            Log.d(TAG, "Notification form: " + form);
            Log.d(TAG, "Notification custom: " + custom);
        }
    }
}
이 부분이 이번 포스트의 하이라이트 부분입니다. FirebaseMessagingService를 extend 하면서 여기서 메시지를 받을 수 있습니다.
이제 앞써 설정한 푸시메시지를 보내고 클릭 후 로그를 찍어보겠습니다.
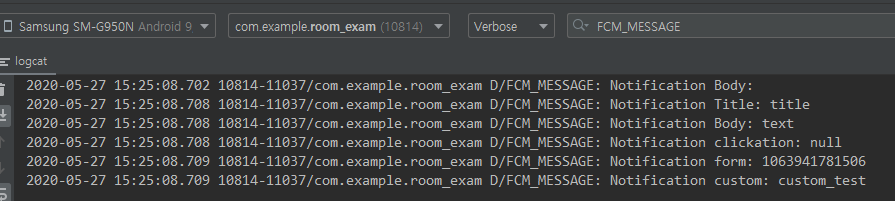
오우 이렇게 나오는군요.
결국 맞춤데이터는
remoteMessage.getData().get("custom") 으로 받아올 수 있었습니다. 안타깝게 키워드에 click_action를 넣었다고 getAction()이 되진 않는군요.
그럼 이제 저 부분에 switch 문을 넣고 원하는 액티비티로 가는걸 구현해볼 차례입니다.

이제 저 안에 do something 를 해봅시다!!
            if(custom_data != null){
                switch (custom_data){
                    case "noti" : {
                        Intent intent = new Intent(getApplicationContext(), NotiActivity.class);
                        startActivity(intent);
                        break;
                    }
                }
            }
그러고 실행해보았다. 푸시알람을 보냈고 아래의 에러가 떴다.

로그를 보면 액티비티 밖에서 startActivity를 콜하려면 Flag_ACTIVITY_NEW_TASK flag가 필요하다는 내용. 그래서 추가했다.
 Intent intent = new Intent(getApplicationContext(), NotiActivity.class);
intent.addFlags(Intent.FLAG_ACTIVITY_NEW_TASK); // <-추가 부분
startActivity(intent);
그랬더니 푸시알람을 보내면 잘 간다.
하지만!!!! 테스트 도중에 큰 잘못을 알게 되었으니..
원하는건 앱이 백그라운드 상태에서 푸시알람 클릭시 해당 화면으로 넘어가는 것이었는데 이건 앱이 포그라운드 상태엣어만 작동하는 기능이었다.
결국엔 기획팀이 원하는 기능을 구현한게 아니어서.. 다시 공부하러 다녀오고 추후에 기능 구현해서 작성하겠습니다.
'개발 > 안드로이드' 카테고리의 다른 글
| [안드로이드] Android Roadmap 2020 (0) | 2020.06.10 |
|---|---|
| [안드로이드] 앱 업데이트를 관리하는 방법 #1 (11) | 2020.06.02 |
| [안드로이드] dialog 안에서 startActivity사용하기 (0) | 2020.05.25 |
| [안드로이드] 구글은 왜 DP(Density-independent Pixel) 만들었을가 (0) | 2020.05.21 |
| [안드로이드] 원하는 좌표를 구글맵 화면에 표시해보자(LatLngBounds) (0) | 2020.05.16 |


댓글