
들어가며
이번 글에서는 Next.js 14 app router에서 Sentry(이하 센트리)를 도입하는 과정에 대해 다루도록 하겠습니다.
2023.01.12 - [개발/Next.js] - [Next] 안정감있는 서비스를 위하여 (Sentry) 이전 글에서는 page router 기준이라 프로젝트 업데이트한 기념으로 작성합니다.
대상 독자는
- Next 14 app router에 Sentry를 도입하고자 하는 개발자
- Sentry 기능을 활용해 좋은 서비스를 만들고 싶은 개발자
이전 글에서 Sentry에 대한 개괄적인 요소를 다뤘으니 이번글에서는 생략하도록 하겠습니다.
간단히 설명하자면 Sentry는 실시간 로그 취합 및 분석 도구, 모니터링 플랫폼입니다. 이미 많은 회사에서도 도입하고 있는 검증된 툴입니다.
바로 코드로 가봅시다!
코드 가보자고
next14 app router. 정확히는 13부터 app router가 시작되었지만.. 아무튼 app router로 변경되고 난 이후 next의 기본 설정들에 큰 변화들이 생겼습니다.
좋아진건가 싶기도 한데 아직까진 어색한 app router..
변경점
변경점들이 있는데 하나씩 다뤄보고 전체 코드로 넘어가겠습니다.
sentry.server.config.js 제거
기존 코드를 그대로 들고가면 콘솔창에 다음과도 같은 에러가 뜹니다. next.js에서 instrumentation를 추가하게 되면서 발생하는 경고문구입니다.
instrumentation를 설명하자면 모니터링이나 로깅툴을 심는 곳이라고 합니다. 딱 sentry에 적합한 곳이죠.
[@sentry/nextjs] It appears you've configured a `sentry.server.config.ts` file. Please ensure to put this file's content into the `register()` function of a Next.js instrumentation hook instead. To ensure correct functionality of the SDK, `Sentry.init` must be called inside `instrumentation.ts`. Learn more about setting up an instrumentation hook in Next.js: https://nextjs.org/docs/app/building-your-application/optimizing/instrumentation. You can safely delete the `sentry.server.config.ts` file afterward.
그래서 이 코드를 제거하고 옮겨줘야합니다.
nextConfig에서 sentry 제거
이번 글에서는 Next.js 14 app router에서 Sentry(이하 센트리)를 도입하는 과정에 대해 다루도록 하겠습니다.
이전에는 아래 방식처럼 nextConfig에 sentry 관련된 옵션을 추가했었는데요. 이번에 제거되었습니다.

이 경우도 똑같이 경고메시지가 뜹니다.
[@sentry/nextjs] Setting a `sentry` property on the Next.js config is no longer supported. Please use the `sentrySDKOptions` argument of `withSentryConfig` instead.
이정도 변경점이 있습니다.
이제 전체 코드로 살펴보겠습니다.
전체 코드
변경점들이 있는데 하나씩 다뤄보고 전체 코드로 넘어가겠습니다.
instrumentation.ts
app 폴더와 같은 계층에 있는 instrumentation.ts입니다.
// instrumentation.ts
import * as Sentry from "@sentry/nextjs";

const { version } = require("./package.json");

export async function register() {
  if (process.env.NEXT_RUNTIME === "nodejs") {
    Sentry.init({
      dsn: process.env.NEXT_PUBLIC_SENTRY_DSN,
      release: version,
      environment: process.env.NEXT_PUBLIC_REACT_APP_PROFILE,
      normalizeDepth: 6,
      tracesSampleRate: 1.0,

      replaysSessionSampleRate: 0.1,
      replaysOnErrorSampleRate: 1.0,

      enabled: process.env.NEXT_PUBLIC_REACT_APP_PROFILE !== "local",
    });
  }

  if (process.env.NEXT_RUNTIME === "edge") {
    // not supported yet
  }
}
저는 next.js의 edge를 사용하지 않으니 일단 제거 했습니다. 각각의 옵션에 대해서는 다루지 않겠습니다. 기본적으로 넣어야하는 값만 적어두었습니다.
sentry.client.config.ts
app 폴더와 같은 계층에 있는 sentry.client.config.ts입니다.
중간에 replay 플러그인을 추가했습니다. 이전에 hotzar와 비슷한 기능이더라구요.
// sentry.client.config.ts
import * as Sentry from "@sentry/nextjs";

const { version } = require("./package.json");

Sentry.init({
  dsn: process.env.NEXT_PUBLIC_SENTRY_DSN,
  release: version,
  environment: process.env.NEXT_PUBLIC_REACT_APP_PROFILE,
  integrations: [Sentry.replayIntegration()],
  normalizeDepth: 6,
  tracesSampleRate: 1.0,

  replaysSessionSampleRate: 0.1,
  replaysOnErrorSampleRate: 1.0,

  enabled: process.env.NEXT_PUBLIC_REACT_APP_PROFILE !== "local",
});
next.config.js
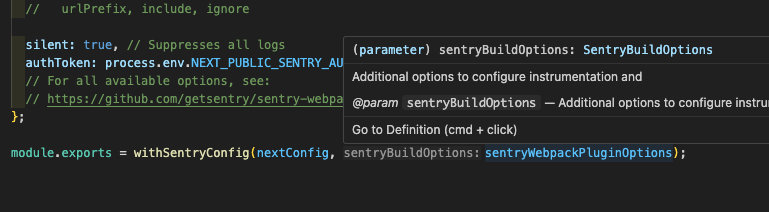
next.js에 들어가는 추가설정입니다. next.config.js
// next.config.js
/** @type {import('next').NextConfig} */

const { version } = require("./package.json");
const { withSentryConfig } = require("@sentry/nextjs");

const nextConfig = {
  reactStrictMode: true,
  /* 중략 */
};

const sentryWebpackPluginOptions = {
  silent: true, // Suppresses all logs
  authToken: process.env.NEXT_PUBLIC_SENTRY_AUTH_TOKEN,
};

module.exports = withSentryConfig(nextConfig, sentryWebpackPluginOptions);
추가 정보 넣기(setUser)
그리고 번외로 추가정보를 주는 방법은 간단합니다. 만약 로그인 이후에 sentry에 user정보를 추가하고 싶다면 setUser를 사용하면 됩니다.
"use client";

import { useEffect } from "react";
import { setUser } from "@sentry/nextjs";

export default function useLogin() {
  const {
    data: session,
    status,
    update,
  } = useSession({
    required: false,
    onUnauthenticated() {
      toast({
        title: "로그인이 필요합니다.",
      });
    },
  });

  useEffect(() => {
    // Sentry에 사용자 정보를 저장합니다.
    if (session?.user) {
      setUser({
        email: session?.user.email,
        username: session?.user.name,
      });
    }
  }, [session?.user]);

  return null;
}
코드를 많이 생략했는데, 로그인 session이 user 정보를 들고있고 해당 정보로 업데이트 해준다고 생각하면 됩니다.
그리고 에러를 발생시키면 user정보가 추가되고 replay까지 함께 넘어오게 됩니다.

마무리
이번에 next.js app router에서 sentry를 도입하는 방법에 대해 다뤘습니다. 생각보다 간편해졌는데요. ㅋㅋㅋ 저는 이만 에러 로그를 수정하러 가보겠습니다.
끝.
'개발 > Next.js' 카테고리의 다른 글
| [Next.js] NextAuth를 활용한 우아한 유저 관리 (5) | 2024.02.25 |
|---|---|
| [Next.js] NextAuth와 Prisma로 인증 기능 구현하기 (2) | 2023.11.27 |
| [Next.js] 분리된 음원을 다시 하나로 (Web Assembly, web worker) (0) | 2023.02.01 |
| [Next] 안정감있는 서비스를 위하여 (Sentry) (1) | 2023.01.12 |
| [Next] localstorage를 사용하는 방법 #1 (4) | 2022.01.28 |


댓글